Category Archives: Equipment, Software & Technique

Photoshop Merge Up Technique

If you edit using multiple layers in Photoshop, the use of the Merge Up technique is very helpful. It eliminates the need for saving multiple copies of an image in various stages of editing.  Also, not only does it save on disk space, but helpful for finding, organizing and retrieving edits associated with an image.

To use Photoshop to Merge Up Layers is actually quite easy. First, select the layers you would like to Merge by clicking on the first and last layer in the Layer Palette while holding down the Shift Key. Once selected all of your layers will be highlighted as illustrated below:

Photoshop Layers Selected
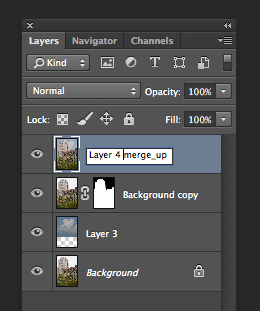
Next, hold down the Alt/Option Key and go to the top toolbar in Photoshop and select Layer > Merge Visible.   mergevisible
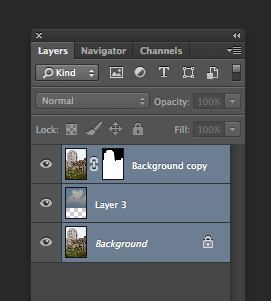
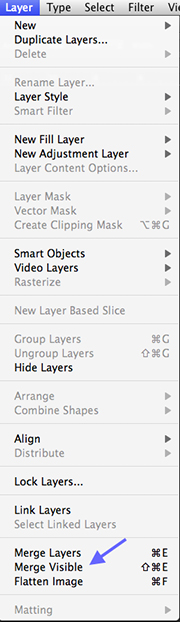
Photoshop will then create an additional Layer, which I always rename Merge-Up.

Merge Up Layer

I hope you find this helpful and more of my work can be viewed at www.susanmcanany.com.


Copy Layers in Photoshop

Have you ever had a situation where you needed to copy the layers in Photoshop from one image file to another? I can’t say I do this often, however, I did have a recent experience where after I had done a significant amount of work removing a trash can from an image only to realize the color profile of the image was of sRGB  and not Adobe RGB or Prophoto which I usually use.  My thoughts were do I let it slide, redo the work or figure out how to get those layers into a different file. The beauty of Photoshop is the multiple ways there are to do something and to Copy Layers in Photoshop is a prefect example.

Here is the image with the trashcan.  Removing the trashcan took several layers of copy and pasting different portions of the image to hide it.  It was pretty straight forward.

archesTo copy the layers in Photoshop from one file to another select the layers you want to copy in the Layers Palette. This is easy to do by clicking on the top layer you want to copy, hold down the shift key and click on the bottom layer you want to copy.

Next, either right-click once the layers that have been selected or click on the tiny down arrow in the upper right hand corner of the layers palette and select Duplicate Layer.

layer optionsYou can also use the Top Toolbar in Photoshop and select Layers > Duplicate Layers.

In the Duplicate Layer window, name your layer and select the file under Destination Document name. It is best to have both files open on your desktop so you file names appear.

Duplicate LayerYour layers will then be copied from one image file to the other. You may need to do some masking or adjustments if the details in the second file are not exactly the same. But on the whole this is a very easy way to save a whole lot of work. Here is the image I am currently working on with the trash can removed.

arches with red door

Thanks for reading and you can view more of my work at Susan McAnany Photography.


Non Destructive Dodge & Burn in Photoshop

Here lately I have been focusing on taking my Photoshop skills to another level and I came across some great information about how to Dodge and Burn using Photoshop non destructively.  For those of you photographers that have never been in the darkroom, the dodge and burn tools originated there. The concept is to control the light from the enlarger as it hits a piece of photographic paper.  Allowing more light to reach an area of the paper would increase the exposure or darken that area of a photo This technique was called “Burn” or “burning it in”.  Alternatively, you could also block the light from hitting the photo paper using a piece of paper or your hand and this was called “Dodging”.

In Photoshop’s Toolbar there are two tools called the Dodge and Burn Tool and apparently using these two tools are fairly destructive to pixels of an image thus not very good for image quality. If you are concerned with IQ, Here is a quick and easy way to to dodge and burn your image non destructively. It is also good for creating a vignette on an image.

1)   Create a New Blank Layer by going to Layer > New > New Layer or by clicking on the New Layer Icon at the bottom of the Layers Palettenew layer icon photoshop

2)   Fill the layer with 50% grey Edit > Fill . Your image will turn gray at this point. Don’t panic.fill screen photoshop

3)   Create a Layer Mask by clicking the icon on the bottom of the Layers Palette.mask tool icon4)   Invert the Layer Mask  – CMD/I. Your image should now reappear and your mask will turn black.

5)   Select the Brush Tool (b)brush, tool, photoshop

6)    On the Layer Mask, paint with Black in areas you would like to be darker or “burn in”. Use the x key to switch to white and paint any areas you would like to be lighter or “dodge”.

Thanks for reading and more of my work can be viewed on my website or at my Etsy Store.


Photoshop CS6 – Why did I wait so long?

I finally broke down and purchased  Adobe’s Photoshop CS6 and now I am wondering why I waited so long. Although I spend a lot of time on the computer, I would rather be in the studio than installing and reinstalling software and plugins. That is not high on my priority of things I like to do.  With that said I have to admit I am finding a lot of great new features in Photoshop CS6 and I am sure more to come.  I love the new darker user interface of CS6 and many of the tools seem much more intuitive, like the Crop tool. While keying in your size, it shows a visual of how the Crop will look. From there you can make further adjustments. The Patch tool now has the Content-Aware feature similar to the Healing Brush in Photoshop CS5 and the Mini Bridge will display a filmstrip, which could be helpful with opening images. Although, I tend to open my images directly from Bridge. I need a slightly larger photo than a thumbnail for the selection process. I am eager to see if any enhancements have been made to the Brush tools.

However, the main reasons I upgraded was for better computer performance and I am happy to report my tower is once again a screamer.  Also, I read Adobe will only offer upgrades from the previous version of Photoshop otherwise a new purchase is required or a move to the Cloud, Adobe’s newest marketing idea.  So I figured might as well take the plunge. If you haven’t yet, I think you should also.

Thanks for reading and happy editing!

Check out my fine art prints at www.susanmcanany.com.

Printing Computer Screenshots – The Easy Way to Print a Screen on an Apple Computer

Ever want to print data off a website without all of their header, footer, etc information or maybe a complete webpage or open web pages on your desktop. Well, if you use an Apple computer,  below are a couple of different ways of printing computer screenshots:

1) To select specific areas of the screen, press the CMD/SHIFT/4 keys and you will get a cross hair on your screen. Use your mouse or Wacom to select the area you would like to to print. When you release the click, your selection will be captured to a file on your desktop. You can then send the file to the printer.

2) To print all web pages open on your monitor use CMD/SHIFT/3. Again it will generate a file on your desktop to be sent to the printer.

3) To print one web page of multiple pages open on your desktop press CMD/SHIFT/4, and spacebar. A small camera icon appears that allows you to select which page to send to a file on your desktop. Just send that file to your printer.

Personally, I find the first option most useful when printing computer screeshots and happy to share this information.

To view more of my work, please visit www.susanmcanany.com.


Adobe Photoshop Blending Modes Shortcut Key

Toggling through Adobe Photoshop Blending Modes using a shortcut key is very useful and easy to do.  Here lately, I have been making a conscious effort to streamline some of my keystrokes while working in Adobe Photoshop by using the shortcut keys Photoshop offers and also programing my Wacom Intuos 4. I must admit it has helped. Not only is it helping with speeding up repetitive key stokes but also with my body mechanics on the computer.  One shortcut key that I have found particularly useful is for changing Photoshop Blending Modes in the Layers Palette. I often find I do an edit on a New Layer, but the Normal Blending Mode just doesn’t look right. By toggling thru the various different Photoshop Blending Modes, my art takes on a different look. To utilize this function, first select the Move Tool (first one on the Photoshop Toolbar), then press the Shift and + (plus) key to toggle through all of the different blending modes. You can also use the Shift and – (minus) key to reverse the order.

There are many shortcut keys preassigned in Photoshop. You can do a quick search on the internet to find a list. In Adobe Photoshop you can also go to Edit>Assign Shortcut Keys to view or change any shortcut key. It is one of those administrative tasks that does pay off with saving time during the editing stage of your images.

Happy Editing!

More of my work can be viewed on my website, Susan McAnany Photography.


Color Profiles Revisited

I just got back from a workshop where the topic of Color Profiles came up and light bulb went off in my brain. Maybe that is why learning is called enlightenment.  Back to the subject of profiles; the ones I have most often have used are sRGB and Adobe RGB (1998).  At the workshop ProPhoto RGB was discussed and recommended for photographic images.

Just what is a Color Profile you may be asking.  It is a set of numbers (data) that allows you to define characteristics of how color on a device will be handled and /or the range of colors that will be displayed or printed. It is an important aspect of color management and an integral part of displaying or printing your imagery.  Below lists some of the main color profiles we use today along with information on when to use them.

sRGB is probably the most widely known and used profile with the most limited color range. It is my understanding most browser (but not all) on the internet display images in this profile. If you ever upload an image to the web without that color profile your work may look rather dull or muted.

Adobe RGB (1998) displays a wider color gamut than sRGB and is often the industry standard for printers and displays.  This is the profile I have historically assigned to my images.

ProPhoto RGB color space was originally developed by Kodak and also known as ROMM RGB.  It offers a very large gamut of color range and capable of capturing more detail especially in saturated colors. It does have its drawbacks though and appropriate for use on 16 bit files only. It is not recommended for 8 bit images.

My workflow is to capture in RAW, where no color profile is assigned yet. I process using Adobe Bridge and in ACR will be now assigning ProPhoto RGB during that process. Prior to printing, I will be converting to Adobe RGB and prior to uploading anything to the web I will be converting to sRGB. The theory it is best to capture and store the widest color possible, especially with the rapid development in technology. This way you have the data for the future when the technology is here.

Thanks for reading and check out my work at www.susanmcanany.com.


Chromatic Aberration Removal

Sometimes Chromatic Aberration is noticeable on an image and a technique is needed for Chromatic Aberration Removal.  You may be asking what is Chromatic Aberration, so let me explain.  It is often found in images where there is an extreme contrast between the light and dark colors and/or highlight and shadows. The dynamic range and sensors on most cameras  just cannot record the two extremes, thus purple fringing occurs or sometime it comes in the form of green or red contamination on the darker color.

Here is a great technique I stumbled upon today to remove Chromatic Aberration using Photoshop CS5.

Here is one method for removing chromatic aberration:

1) Open the image in Photoshop CS5 and copy the Background Layer (CMD-J).

2)  Go to Filter > Blur > Gaussian Blur.  You can experiment with the amount of pixels here, but I had good luck using 15 pixels.

3)  Change the Blend Mode on the Layer to Color.

4)  Add a Mask to the Layer and then invert the Mask.  (CMD-I)

5) Paint with White to areas where you want to remove the CA. If you apply too much, change to Black and paint to remove.  Also, using the Opacity slider on the brush will help  control the intensity of the filter.

I also read  Lightroom 4 has a great tool to remove CA. I guess I will put that piece of software on my Wish List.

The more I learn about photography,  Photoshop and art the more I find I need and want to learn.

Happy Post Processing!

Visit my website, Susan McAnany Photograpy, to view my work.

Just a quick update to this post. I have used this technique also with Photoshop CS6.


Painting With Light Technique

Painting with light is one technique I really enjoy experimenting with. I think I like it so much because I never know exactly what I am going to get. There is definitely a surprise element when you try the technique of painting with light. If you have been following my post, I’m sure you’ve noticed I am always searching for the unusual and like to experiment.

I have been doing some research on the Painting with Light technique and wanted to share my findings and first efforts. The image below was taken in a harbor on Sarasota Bay with the Ringling Bridge in the background on the right.  The mechanics of the process is to place the camera on a tripod and using a slow shutter speed rotate the camera either left and right or up and down. For the image above, I obviously rotated the camera laterally.  The exposure was 1 second at f/22; ISO 100. I was shooting at sunset, which required me to really stop down the aperture. I was wishing my ISO would go to 50, but no such luck just yet with most digital cameras. There is definitely some experimentation required with the shutter speed and this process can be done with speeds as fast as 1/15 of a second. As always, lighting rules and shoot many frames.

“Ringling Bridge” Painting with Light

paint with light technique

Abstract of Ringling Bridge and Sarasota Bay.

View more of my work at www.susanmcanany.com.

Thanks for reading!


Color Profiles

This week I have been wrestling with Color Profiles and Photoshop’s CS5.

Now, my typical workflow is to shoot in RAW, my camera set to Adobe RGB Color Profile.  From what I have read there is a greater color gamut using this profile and my current thought process is more is always better.  My software of choice is  Adobe Bridge, Photoshop’s CS5 along with plugins from Nik and Topaz. I save my files as layered TIFF and prior to uploading to the web, I will re-size, convert to sRGB  and save as jpgs. For some of my  prints, or commercial print projects I often need to convert my files to CMYK.  This workflow has served me well over the last several years.

However, I have just been working on a batch on images and I noticed many of my Tiff files have the sRGB profile as their Working and/or Embedded Color Space.  Initially I wasn’t sure how this happen, thus it motivated me spend time researching more about color profiles.

Now I am by no means a techie person, so I try to decipher things down to simplistic concepts that I can easily remember. Like most photographers I am the happiest behind the camera in my creative zone.  I am however aware of the importance of a calibrated monitor,  printer and selecting correct printer paper profiles and  I do this to the best of my ability. But now I am looking at embedded profiles and working color spaces, what is this all about??

After doing several hours of reading, I found out a few core things that have helped clarify my mind on this subject.

Now we all  know color is defined by numbers and a Color Profile is how color’s numerical value visually appear, however, I didn’t know that a Raw file has no Color Profile and any type of profile is pretty much device specific.

The Working Space defines what color profile is used in the different color models such as RGB and  CMYK. These profiles are specified in the Color Settings Dialog Box in Photoshop (Edit  > Settings) and provides the info for an embedded profile.  Mine was set to sRGB causing the previously mentioned problem.

The Embedded Color Profile is the numeric value a monitor or internet browser uses to display colors and often they display in sRGB, especially the internet.  It is embedded in the image when an image is saved.  The data for the embedded profile comes from either EXIF data captured when your image was taken or what is in your Color Settings Dialog Box in Photoshop if a Raw file is launched into Photoshop without using an interface software program, such as Bridge Camera Raw.

In Photoshop, once you have established your parameters to the Color Settings Dialog Box,  you have the option to use the command Convert To Profile to change an Embedded Color Profile. You can even convert an entire folder easily using the Image Processor. Choose File > Scripts > Image Processor. Another handy tool is the  Assign Profile, which allows you to view how colors in an image will look with a different profile, but this is not an effective way to change an Embedded Profile.

Below is a link to an interesting read about the subject from someone who knows far more than me. I also found some useful information on Adobe’s website.

http://www.computer-darkroom.com/ps12_colour/ps12_1.htm

You can view my work at www.susanmcanany.com.