Ever wonder if the Print Size display feature of Photoshop is accurate in showing you the detail of your image? This Photoshop feature for CS6 is located under View on the top toolbar of Photoshop.
If you have a lot of prints professionally printed like I do or if you print yourself, you want to get as accurate visual of your print as possible prior to sending it off to a printer or printing it yourself. In order to do this you must make sure the resolution of your monitor reflects as accurately as possible the pixels per inch you plan to print. The default is Photoshop is your screen dpi. We all know printing cost money regardless of how you do it. Thus when using the Print Size feature in Photoshop you are a little bit closer to viewing the actual output .
After doing some research, here is a quick and easy way to determine and adjust your monitor resolution.
- Open Photoshop and create a blank square white page at 300 dpi utilizing the top tool bar File > New. For this example I made mine 7 x 7.
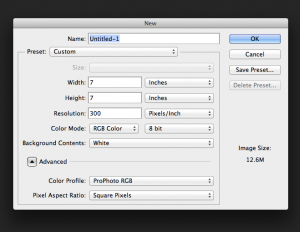
- In Photoshop go to View > Print Size.
- Using a ruler or measuring tape carefully measure the width of the blank square white page. Be carefully not to scratch your display. I used a soft measuring tape and it worked great. My page measured 6 inches. Yours will undoubtedly be different. It depends on the monitor you are using.
- Next, divide the width of your white blank page by the measured inches. I divided 7 by 6 for a quotient of 1.16
- Multiple 1.16 by 72, which is the current screen resolution on your monitor. My answer was 83.52 that I rounded up to 84.
- The final step is go to Photoshop>Preferences>Units & Rulers and update the screen resolution to the number from step 5.


And that is a quick and easy way to synch your screen resolution to reflect your print size and hopefully gauge print output using the Print Size feature of Photoshop. In order to utilize this function when viewing an image be sure to look at it in actual print size by going to the top tool bar in PS and selecting View>Print Size. Also, this technique is geared for Photoshop CS6.
Thanks for reading and my work can be viewed at www.susanmcanany.com.