Category Archives: Equipment, Software & Technique

Creating a Digital Signature

For quite some time, I have been contemplating creating a digital signature for signing and numbering my prints. Typically, I print on paper allowing an additional half inch on all sides of the print and after I receive the print from printer, I sign on the lower right hand corner of the print. Lately, I have been experimenting with having my work printed on aluminum and plexiglass, thus I wanted to create a digital signature to place on the image prior to printing. After doing some research, I found two different methods. The first involves scanning the signature as a jpg file and manipulating in Photoshop. The second technique is to create a brush of your signature. This is the one I decided on and will go into further detail on the technique.

Creating A Digital Signature

  1. In Photoshop, create a new blank page file.  I found using 3 inches Wide x 2 inches Height; Resolution 300 dpi to work great for prints that are 20 x 30 inches in size. If you are printing smaller or larger you will probably have to experiment with the size of your signature. In addition, you can also use the Transform command to resize the layer once it is on the print.  Also, assign the parameters of Color Profile and Bit Size what ever you most commonly use on the file.
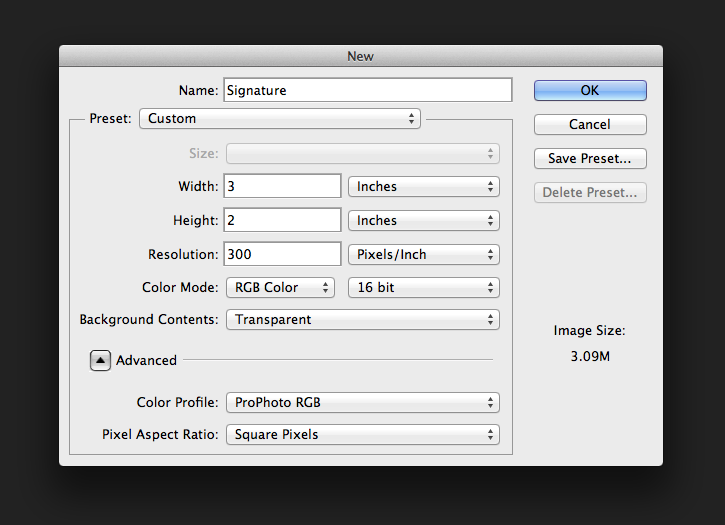
Creating a Digital Signature

2. Select your brush tool. I used the 15 pixel right slant Calligraphy brush, usually with black paint. Depending on your image you may need a different color for the text to be obvious.  If you do not have the Calligraphy brushes imported into Photoshop, you can Append the file and add them from your brush folder.
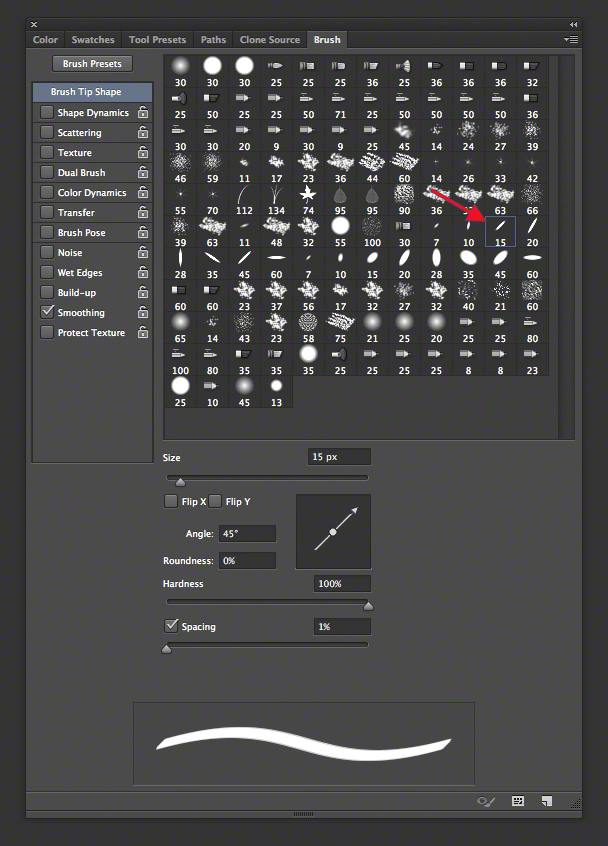
creating a digital signature

3.  Now comes the fun part. Using your Wacom pen and tablet, write your name on the translucent 3×2 file you created. Be prepared to experiment with this because you probably will not like your first try. Just go back in your History Palette to erase and start over. Once you get your signature the way you want it, save it as a Brush Preset and you will have it ready and available at any time.  Actually, I had a lot of fun with this part.

sign2b_16_ppcpBest

4. To place on an image, just open both files in Photoshop. Drag and drop the layer from your signature file onto your image. From there you can use the Transform tool to resize if necessary and place where you want it.

Whether you are creating a digital signature for fine art prints or using this technique to watermark your images, remember to have fun when you are creating your digital signature.  Thanks for reading and check out my work  at susanmcanany.com.

Night Photography Tips

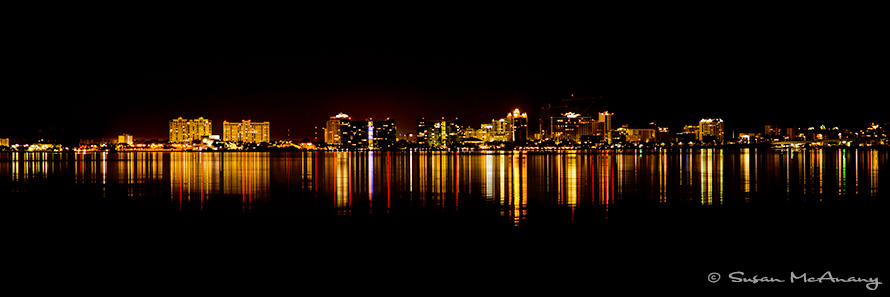
Night photography is always fun and can produce exciting images especially when there are some stunning lights or fireworks to capture. I was fortunate the other evening to notice some awesome lights being reflected on Sarasota Bay very close to where I live. So close actually, I was out there shooting the skyline in my bathrobe.  Now that alone would of been a great photograph! I have seen the water very still before and some nice reflections, but never such vibrant lights being reflected. Overall, the air and water temperatures were on the cooler to cold side so maybe that contributed to the colorful reflections. It truly was magical, so I grabbed my camera and tripod and got to work doing night photography.

Night Photography Tips

  1. Pump up your ISO. I used 400 for the photo below. Unfortunately, with anything much higher than ISO 400 combined with the low light conditions of night photography you may see a lot of noise.
  2. A tripod is a must or something very sturdy to support your camera.
  3. Use Manual Mode on your camera. This will allow you to adjust independently your Aperture and Shutter Speed.
  4. Keep your Aperture as wide as you can. If the distance between your camera and subject matter is great as in the image below, f4.5 to f5.6 will work just fine, producing sharp in focus images.
  5. You will also have to open up your Shutter to allow more light. On the camera’s meter my image was a good 1-2 stops underexposed.
  6. A remote shutter release is recommended or you can also use the timer on your camera.
  7. Take lots of snaps at various Aperture and Shutter speeds and be sure to bracket, bracket, bracket.  Experimenting and practice is the best teacher for night photography along with photography in general.
  8. Remember to bring a flashlight.  This believe me is a critical tool for doing night photography.

“Night Lights”

Night photography of Sarasota Skyline

Sarasota skyline at night.

Well, I hope these night photography tips have been helpful. Now go have some fun shooting your local skyline or any other interesting lights in your neighborhood or city.

If interested in night photography, you may enjoy this post on shooting lightning strikes.

Thanks for reading and more of my work can be viewed at www.susanmcanany.com.

Abstract Photography Techniques

Here lately I have been experimenting quite a bite with abstract photography techniques to create a new series of prints. I am fortunate to live in a beautiful place surrounded by water and I wanted to create a series of images that capture the beauty and tranquility of the Gulf of Mexico and Sarasota Bay. There is also a certain amount of uniformity and monotony in the landscape of a state that is at sea level, however, I have notice the water color changes throughout the day as the sun progress through the sky and the color of light changes. It is very interesting to observe and has provided me with a new appreciation for where I live. Using the motion or swipe abstract photography technique, I have been experimenting with capturing the varying colors and consistent vertical and horizontal colors.

This abstract photography technique requires a very slow shutter speed and smooth movement of the camera along a vertical or horizontal plane. Since I am capturing so many horizon lines, I typically shoot on a mono-pod or tripod. If you are not using either, keep your arms tucked in close to your body to provide stability for your camera. Your shutter speed must be slow, typically around 1/10 to 1/20 of a second. I generally use a small aperture to help achieve a slow shutter speed. On some images I have also used a polarizing filter to reduce exposure. Start moving your camera at a slow, but even pace and click the shutter. The important part is to click the shutter after you have started moving.  This abstract photography technique will require a certain amount of experimentation on your part to find the right aperture and shutter speed that works with your subject, but that is all part of the fun.

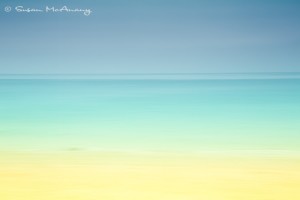
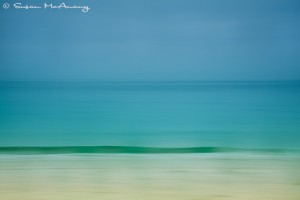
Here are a couple of examples:

Title: “Seaside”

Abstract Photography Example

abstract photography

Title: “Gulf Waters”

Abstract Photography

The full collection of my water images can be viewed here.

We all love to go somewhere new to become inspired and create new work. Fortunately, I have found being creative with abstract photography techniques has provided the perfect tool to become excited once again with the place I live.

Thanks for reading and more of my work can be viewed on susanmcanany.com or at my Etsy Store.

Pros & Cons of the Canon 5DS R

I just completed a 4 day rental of the new Canon 5DS R that I have been lusting after since it was first announced some six months ago.  My initial impression was it seem lighter than my 5D Mark III which thrilled me. But after checking Canon’s website the difference is so small, I can hardly believe I could notice the difference. The Mark III, body only, weighs in at 30.5 oz.; 5DS R weighs in at 29.80 oz. Initially, I also was not impressed with the sound of the shutter release on the Canon 5DS R. To me it sounded rather plastic-y, however, my partner liked the sound better on the 5DS R than the Mark III so obviously this is just a personal preference.  It certainly wouldn’t deter me from a purchase. Below is a list of the major pros and cons from my experience with the Canon 5DS R.

5DS R Pros

A whooping 50.6 Megapixel file for gi-normous prints and wonderful cropping opportunities.

More sophisticated focusing technology that needs to be fully understood.

Great new Mirror Lock Up options permitting the camera to perform the second click after a designated time, reducing camera shake.

Knobs, dials and menu system quite similar to my Mark III, so operations were easy and transition to the new camera would be a snap.

As with other Canon cameras, image quality was great.

5DS R Cons

Don’t be in a hurry with the Canon 5DR S because those big files take awhile to write to the card in the camera.

Photographer’s technique needs to be close to perfect when shooting.  Any errors are magnified due to the size of the file capture.

Although, I have plenty of storage space on my computer, the processing speed got somewhat bogged down in Photoshop especially when working with 16 bit, Smart Layer files.  I may need to factor in a new computer. Yikes!!

When I look at the images now, I can’t see that great of image quality improvement from my 5D Mark III.   Image size Yes, the files are BIG.  But then any new camera requires a period of adjustment to learn how to get the most from it. I am sure the time I had with this camera was not long enough to get everything out of it that it offers.  The more you use the tool, the better results you will get.  I have owned the Canon 5D, Mark II and Mark III and to this day I think the Canon 5D Mark II produced the best result for me. I know is only because I did a tremendous amount of shooting with that camera in the studio, on location and everywhere else. I knew it like an extension of my body.

In the end though,  I was sorry to pack up the Canon 5DS R camera and send it back to lensrental. Like any good camera junkie, I will probably purchase one sometime in the not too distance future. Who knows, maybe Santa will surprise me.

Thanks for reading and check out my work at www.susanmcanany.com.


Print Size Feature In Photoshop

Ever wonder if the Print Size display feature of Photoshop is accurate in showing you the detail of your image? This Photoshop feature for CS6 is located under View on the top toolbar of Photoshop.

If you have a lot of prints professionally printed like I do or if you print yourself, you want to get as accurate visual of your print as possible prior to sending it off to a printer or printing it yourself. In order to do this you must make sure the resolution of your monitor reflects as accurately as possible the pixels per inch you plan to print. The default is Photoshop is your screen dpi.  We all know printing cost money regardless of how you do it.  Thus when using the Print Size feature in Photoshop you are a little bit closer to viewing the actual output .

After doing some research, here is a quick and easy way to determine and adjust your monitor resolution.

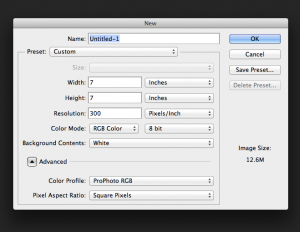
  1. Open Photoshop and create a blank square white page at 300 dpi utilizing the top tool bar File > New. For this example I made mine 7 x 7.  New Page Screen CS6
  2.  In Photoshop go to View > Print Size.
  3. Using a ruler or measuring tape carefully measure the width of the blank square white page. Be carefully not to scratch your display. I used a soft measuring tape and it worked great. My page measured 6 inches. Yours will undoubtedly be different. It depends on the monitor you are using.
  4. Next, divide the width of your white blank page by the measured inches. I divided 7 by 6 for a quotient of 1.16
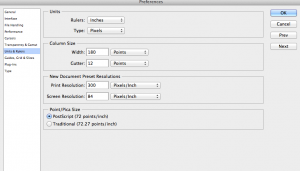
  5. Multiple 1.16 by 72, which is the current screen resolution on your monitor. My answer was 83.52 that I rounded up to 84.
  6. The final step is go to Photoshop>Preferences>Units & Rulers and update the screen resolution to the number from step 5.  Units & Rulers Screen CS6

And that is a quick and easy way to synch your screen resolution to reflect your print size and hopefully gauge print output using the Print Size feature of Photoshop.  In order to utilize this function when viewing an image be sure to look at it in actual print size by going to the top tool bar in PS and selecting View>Print Size.  Also, this technique is geared for Photoshop CS6.

Thanks for reading and my work can be viewed at www.susanmcanany.com.


iPad Screen Revitalized

I had been having some problems here lately with my iPad. It is a couple of years old and  just didn’t seem as shiny and bright as when I got it.  Also, at times I had problems accessing links sent to me via the messaging system, though I did seem to get around that problem using various different creative techniques.

Initially, I got the iPad to show my portfolio to galleries and projects to clients and it is helpful for those purposes.  Also, I had visions of creating a stunning iPhone portfolio and although that has not transpired, I do enjoy working on my iPhone images with various apps on the iPad, especially when traveling. It is a wonderful creativity booster.

But what I really love is  iBook.

But then I had a problem with iBook!! Since getting my iPad, I have become addicted to the darn thing for reading. I thought I would never give up the thrill of turning a paper page of a physical book; then there was the iBook.  In addition, I had access to the iBook store, more commonly known as iTunes. I love that I can lay in bed, or on the couch or be in the airport and shop for books. And for some reason, which, I refuse to question, I read at a much greater speed.

Recently, I had been reading this fabulous book by Victor E. Frankl, “Man’s Search for Meaning” and using the highlighting function. Although, the book nearly brought me to tears at times, I am enthralled with the message. I am using the highlighting feature of the iBook program constantly. I am 160 pages into an 183 page book, highlighting a specific passage and guess what, it highlights the entire book!!  Oh …. s_ _ t!!

I spend some time trying to figure out how to undo, and when I do it deletes ALL of my highlighted passages. I am very discouraged with technology and Apple; I ignore my iPad for about 18 hours.

Lazy Sunday morning arrives, I forgive my iPad and iBook and take up reading the book again. ( I generally don’t hold grudges.)  I am lying on the couch, my iPad screen is being side lit by the sun and I notice the smudges and grim on my iPad screen. I think “this looks disgusting”. I examine a little further and begin to research how should I be cleaning this darn thing, my beloved iPad.  It wasn’t it’s fault after all.

Cleaning your iPad

1) Depending on the degree of filth, you might want to take it out of the case.

2) Optional, blow some of the external dirt or fibers off the device.

3) Some sites recommended using some kind of cleaner, but I took Apple recommendations and just used a soft, lint free cloth. It was a cloth I had previously purchased to use on my Apple monitor.

I was amazed how quickly it removed all the smudges and guess what, I am back in love with my beautiful, bright and wonderful retina screen iPad!! I love this device so much, maybe I should just break down and give it a name!

Thanks for reading and check out my work on my website.


Alligators, Babies and More

Alligators, babies and more were the target of my shoot last Sunday at the Myakka State  Park. Recently, this has become our go to spot for hiking and general immersion in nature. It is really quite beautiful to see and be in “old Florida”. One of the few natural habitats in my area (southwest Florida) that has not been infiltrated by non indigenous plant species. Everything from palm and oak trees, Spanish moss, exotic birds and of course alligators grow freely, protected and uninhibited there.

We are always on the lookout for alligators. It is easy to spot their hangout spots  always close to the shoreline and filled with sun. The vegetation is brown amongst tall green grass and literally all smashed down from their endless lounging.  Luckily they seem to hangout on the opposite side of the river as the hiking trail. But one never knows when or where they may cross over, which adds to the adventure of the hike. Often times we see them in water; their partial snout and eyes just right above the waterline taking it all in or maybe spotting prey. Lets hope not human.

This past week, I had my Canon 5D Mark II camera with the 70-200 f2.8L lens. I used a mono-pod for stability and even though the wind was pretty kicked up, I was happy with my images. It is hard to go wrong with that lens. Give it plenty of shutter speed and the rendering is beautiful.  Although I love nature and totally enjoy being in it,  I will admit, unless I am with a group of photographers, I am not much of a landscape photographer.  It requires a level of patience I currently do not have. There as such wonderful landscape photographers, professional and amateur that know how to capture the essence of a scene. I am much more of a zoom in on the details type of person/photographer. This I believe is illustrated with my portfolio at www.susanmcanany.com

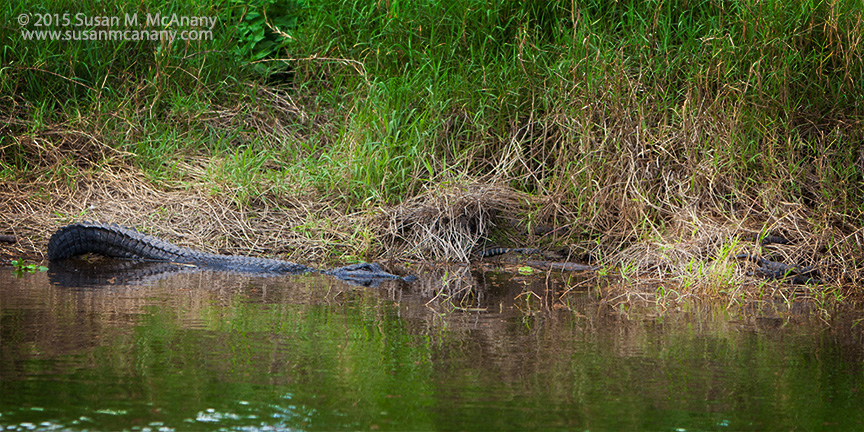
Regardless, I had a blast on Sunday and here is a shot of the alligators we saw. This shot contains a momma and baby alligators off to the right somewhat concealed in the vegetation. Very fascinating!

Alligators in the wilds of old Florida

alligator, babies

Momma with baby alligators.

Thanks for reading.  Make it a great day!

More of my environmental prints can be viewed in Nature Made in my Portfolio.


Creating Borders Around Images

Creating borders around images can do a lot to enhance an image and make it stand out. This is especially important for viewing on the web whether you have your own website or using Pinterest, facebook or other social media outlets or image sharing sites. It can be a simple as putting black borders around an image or something a bit more complex with multiple borders and simulating a frame. Below are three quick steps to putting a border around your image using Photoshop CS6.

Creating Image Borders

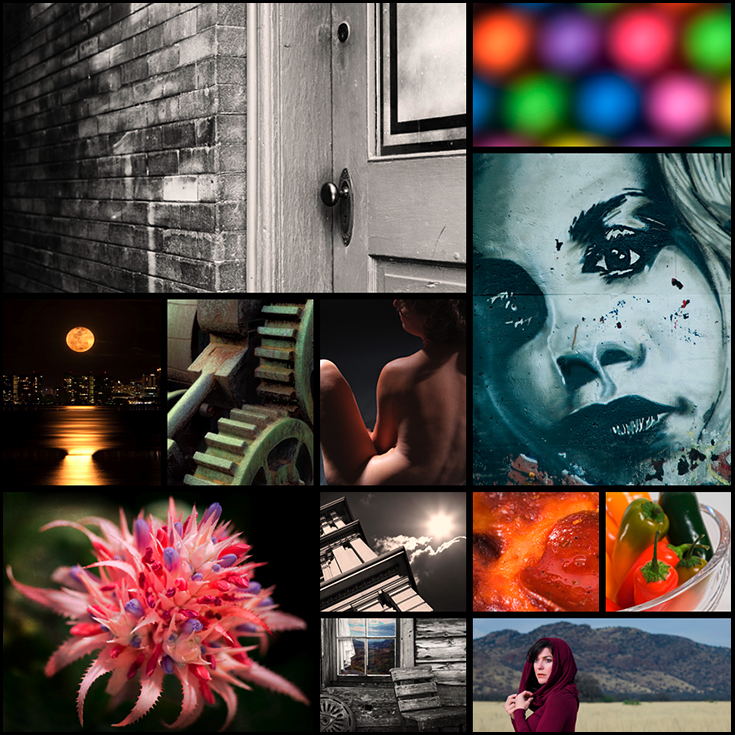
1) Give some thought to the final size you would like your image. Using Pinterest as an example, I know one of their pin sizes is 735 x 735 pixels and pins look good with a 8 to 10 pixel border. For this example I will use a 10 pixel border in black.

image_size

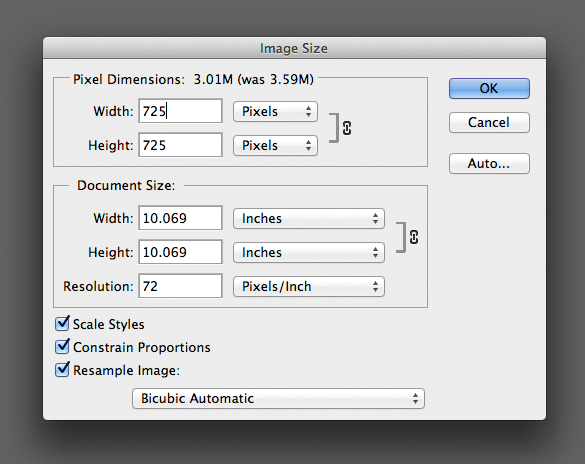
Image Size Screen in Photoshop CS6

2) Open the image in CS6 and go to Image > Image Size and resize the image to 725 x 725 pixels x 72 pixels.If your image is not square format, you could use the Crop Tool and crop an interesting portion of the image and link the Pin to your posted image. If you use the crop tool, be sure to click the Option to Delete cropped pixels located on the top of your toolbar.

canvas_size

Canvas Size Screen from Photoshop CS6

3) Final step is to go to Image > Canvas Size and expand the Canvas. First make sure Pixels is selected in the drop down menu and enter 10 in the Width and Height. This will change your total image size to 735 x 735 pixels. For the Canvas extension color field use the drop down menu and select Black or one of the other choices of White, Grey. You may also want to select a custom color using Other option and Color Picker to select the color you desire. If the Canvas extension color option is dimmed and you are unable to make a selection your Layer is probably not locked. The canvas extension will appear transparent after accepted. Just add a blank Layer and fill that layer with whatever color you want for your border.  Either way works beautiful and creating borders around your images gives you a great tool for finishing off your images.

Here is an example of a pin I created using the above three simple steps.

susan_mcanany_art

Thanks for reading and more of my work can be viewed on www.susanmcanany.com.

Follow me on twitter: @susanmcanany


Tips for Shooting Fireworks

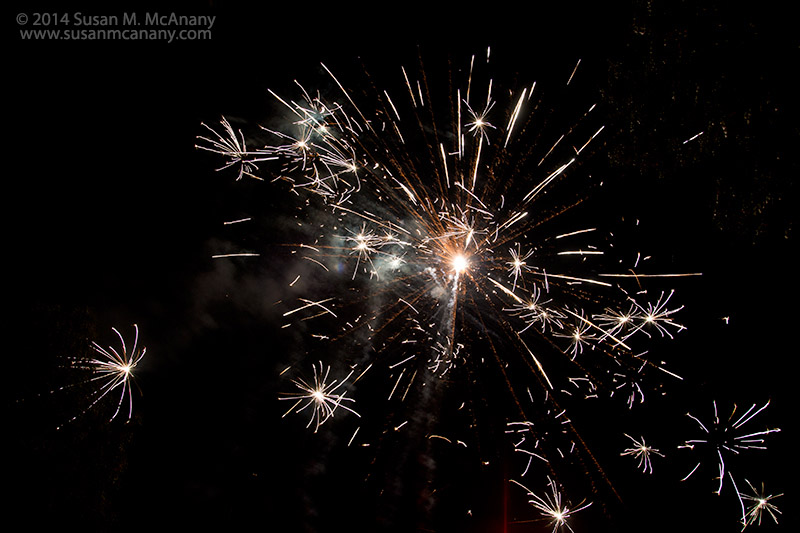
Just back from a vacation that included shooting fireworks. Although, I didn’t have a tripod with me, I did manage to get a couple of keepers. Without a tripod, the trick is to make sure you are very stable in your stance. I sat and used my arms as a two legged tripod resting against my knees. The goal is to be stable enough to deliver a sharp image at slower shutter speeds. Holding your breath when clicking the shutter helps too. That is how I was shooting that night.

Here are a few other tips on how to photograph fireworks.

1) Increase the ISO on your camera. Many newer cameras deliver low noise at ISO 800 and above, so I would not hesitate to use those speeds on your camera. It will help tremendously with higher shutter speeds and sharper images.  In addition, if do you need to reduce noise, there are options in Photoshop, Lightroom and several Plug Ins such as Topaz Labs DeNoise and Nik’s Define that would accomplish that task. But often with the dark night as a background for the fireworks, noise is not very obvious.

2) Set your camera to Shutter Priority and for the image below I used a shutter speed of .5 of a second. You may need to increase this amount based on your quickness with the shutter release and if your camera is on a tripod. A longer shutter speed will let in more light, which also will lighten the dark sky. You could also use the Bulb setting on your camera that allows you to manually determine your shutter speed.

3) If possible, use a tripod or situate yourself where you can use your body as a tripod.

4) Use a lens with a wide focal length. For this image I used my Canon 24-105mm lens and shot at 24mm. If viewing an elaborate fireworks celebration, a wider lens would be beneficial. You would pick up more of the sky and the fireworks.

5) Once the camera is set up, try to get a feel for the timing of the fireworks and keep your camera positioned at the area where they go off. If you can use a remote cable release this is easy to do. When you see them hit your spot, press your shutter.

6) Be aware and adjust the camera settings as needed depending on your results.

Good luck and have fun!

fireworks

Thanks for taking a look. More of my work can be viewed on my website.


Blur Photo Border using Photoshop

Here is a quick and easy technique to blur photo border using Photoshop. I found this is helpful in portraits to bring more emphasis to the subject matter similar to adding a vignette. It is also helpful diminish any distracting details that may be in the background or  to blend an expanded canvas with the original photo.

1. In Photoshop, copy your Background Layer or click on the Background Layer to convert it to Layer 0.

2. You can use either the elliptical or rectangle tool to isolate the area you want in focus. Personally, I tend to use the elliptical tool more frequently. It seems to blend better for me.

3. Feather the area between 5 and 10 pixels. You may have to experiment with the amount depending on your subject and composition.

4. Invert your Selection by either using shortcut keys Shift/Command/I or the top toolbar Select > Inverse.

4. Create a Layer Mask by clicking on the Add Layer Mask icon on the bottom of the Layer’s Palette.

5. Create the blur using the Gaussian Blur filter. On the top tool bar select Filter > Blur > Gaussian Blur. You will also have to experiment with amount to get the your desired effect.

6. If the blur is too intense, use the Opacity Slider to decrease the amount on the Layer Pallete. If you would like to remove the blur from certain areas, use your brush tool on the Layer Mask  and paint in black the areas you want to remove or in black for areas you want to add the blur.

As with much of Photoshop, there are many ways to do one task or effect and to blur photo border is no exception, so experiment with this technique and other Blur options available under the Filter Toolbar or also with the Blur Tool.

Thanks for reading and happy editing. Visit my gallery to view more of my work.