Photoshop Shortcut Keys I Love To Use

Using Photoshop shortcut keys is one way to simplify and speed up editing an image. Since I am always looking for any method to speed up my process, I find these helpful.  Many shortcut keys are pre-assigned by Photoshop and can be found under the Edit > Keyboard Shortcuts Menu.

Photoshop Shortcut Keys Menu

However, it is also easy to assign your own  Photoshop shortcut keys for processes you do often.

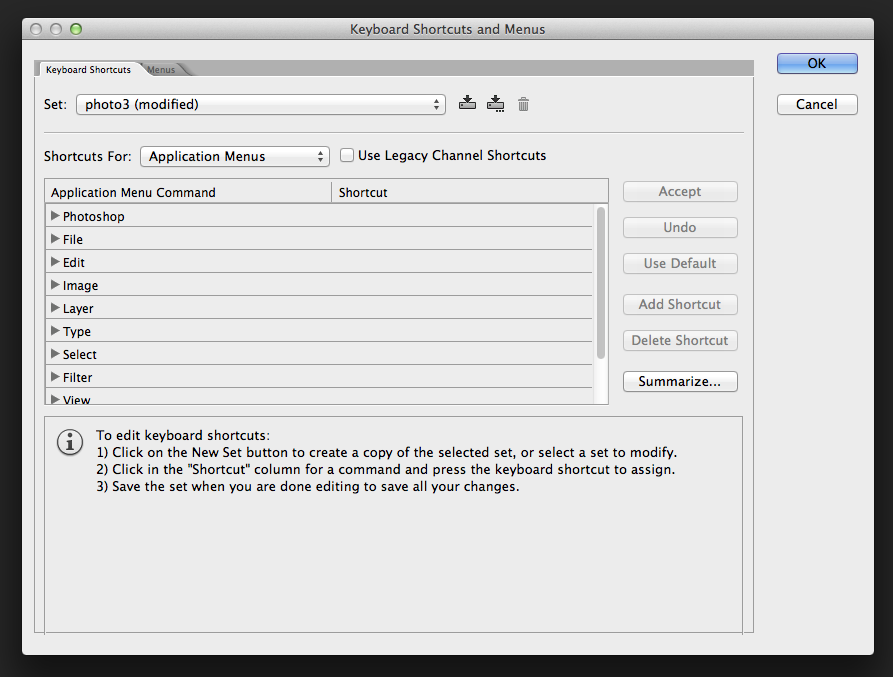
Here are some simple instructions that pertain to Photoshop CS6:

1) Navigate to the Application Menu Command you wish to change.

2) Click on that command  and a white box will be displayed.

3) Press the keys you would like the command to respond to.

4) Press OK.

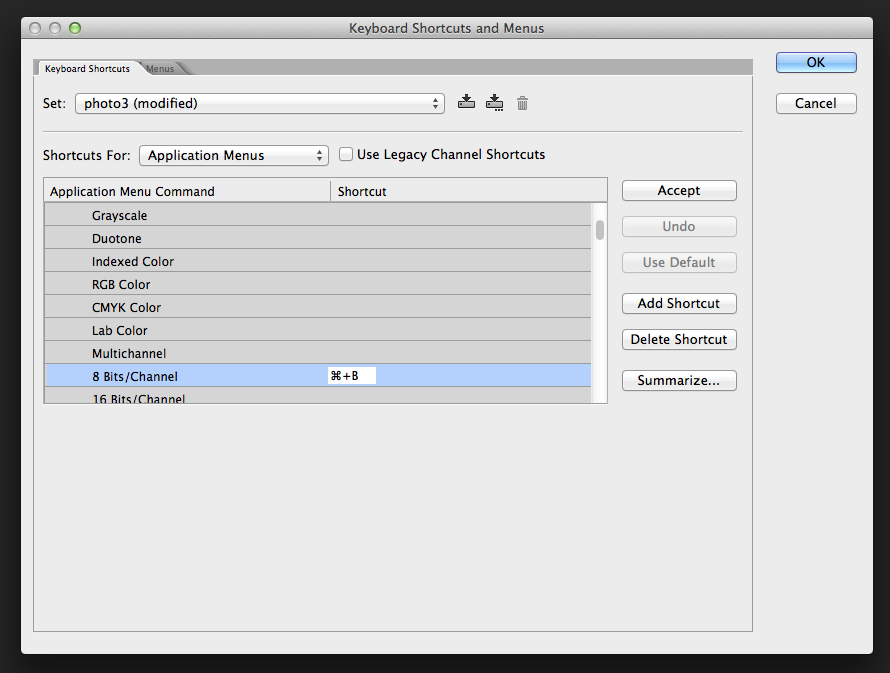
As you can see in the example below, I have assigned the shortcut keys  for the command for Image > Mode > 8 Bit to Command+B.  If the keyboard command you are attempting to assign is already in use, you will be alerted and you can decide if you want to continue.

Here are a list of some of my favorite shortcut keys:

Save:    Command/Windows + S

Close:   Command/Windows Key + W

New:     Command/Windows + N

Free Transform:   Command/Windows + T

Convert Profile:     Command/Windows + R

Convert to 8 bit:    Command/Windows + B

Invert:    Command/Windows+ I

Merge Down:    Command/Windows + E

Merge Up:    Option/Alt + Command/Windows+ E

Flatten:  Command/Windows + F

Select All:    Command/Windows + A

Deselect All:    Command/Windows + D

Editing  and using Photoshop shortcut keys is very easy to do and will truly help you save time when editing your photos.

Thanks for reading and view my work at susanmcanany.com.


Reimagine an Image With Photoshop

Often when I have an image I like but want to make it stronger I will reimagine the image. This requires thinking outside the box and tapping all of my creative thoughts and ideas. Also, a quiet room, a powerful computer and a few Photoshop plug ins help immensely.

On the example below I first combined two images I had previously taken of a train wheel. I always liked the shape and modern industrial nature of the images, however the darkness of the subject matter had always bothered me.

Reimagine abstract art image of train wheel.

Here is what I did:

  1. I combined the two images in Photoshop by copying one image into the other, creating an image file with two layers.
  2. This allowed me change the Overlay Method on one of the Layers.
  3. Next I did some masking on one of the layers so a more abstract image began to evolve.
  4. I merged up my two layers when I was satisfied with the overall composition.
  5. I used two different plug ins for this image: Topaz Glow and Topaz Impressions  It did take a bit of time and experimentation with both of these plug ins to achieve a result I was happy with.
  6. Finally I used Photoshop Curves Adjustment to darken and lighted areas of the print I felt needed it.

Here are the two images I started with. I personally like the new reimagined image and plan to offer it for sale on my website, but that is of course my taste. People close to me still like the original ones better, so I guess I will leave those also. That is the beauty of digital imaging.

Original Images

Close up of train wheel.

Contemporary image of train component.


As always, thanks for reading and if you get chance visit my website or Etsy store. Keep shooting and experimenting!

‘Tis the Holiday Season

As December rolls in, so does the holiday season and year end. This is a great time for reflection on personal matters and to review projects and work completed during the passing year. This year I created some truly unique, quality fine art photos that make wonderful prints to give as presents. Many of my newer pieces can be found in the Abstract or Nature Made Portfolios on my website, although, there are fabulous prints available in every Portfolio. Send me an email if you need more details about any print.

Selling stock images was recently added at my Etsy Store.  Many vintage ornament photographs not found anywhere else are available, along with other holiday themed images. These make great additions for your holiday greeting cards or invitations and decorative headers for your web site. The files are sold as royalty free jpeg images, free of any water mark and delivered instantly by digital download. Check them out if you have a free moment.

Here is a sneak peak at some of my holiday stock images.

vintage hand painted ornament

Hand painted holiday ornamental ball

stock photo of decorated holiday cookies

Stocking stuffed with coal with greenery and ornament.

I also have quite a few textures and delicious looking food clip art images available for sale.

Thanks for visiting my site and reading this post.  I wish you the a wonderful holiday season and a prosperous new year.  More of my work can be viewed on my website www.susanmcanany.com.

Tips for Getting Sharp Images

Recently I had to mentally review tips for getting sharp images for a project I am working on. Now many of these techniques I have been using for years, but this project involves a macro lens and a moving subject so I needed to dig deep for all tips and techniques for getting sharp images I have come across throughout my photo career. Here is what I came up with and I wanted to share them with you.

Tips for Getting Sharp Images

  • A fast shutter speed is required to freeze movement, so make certain the Aperture and ISO on your camera are set appropriately to achieve a Shutter Speed of at least 200. Faster if you can get it there because the faster the better for freezing movement.
  • Depending on lighting conditions, there is a good chance you will need to increase your ISO to reach a fast enough shutter speed.
  • If using an external flash, experiment with High Speed Synch to see if that would be useful.
  • Use a support system. This could be a tripod, monopod, a pile of books or wall to brace yourself or your camera.
  • Invest in a camera shutter release or use the self timer on your camera.
  • If you are not using “live view” on your camera, use the mirror lock up function if available.

If you follow a few of the recommendations above for tips for getting sharp images, I am sure your images will be sharper and move beautiful.  Most of all have fun when you are shooting.

Here is one of the images I have been working on.

Tips for Sharp Images


Thanks for reading and check out more of my work at www.susanmcanany.com. Also if looking for great stock images, visit my Etsy store. I offer a wide range of digital downloads.


Happy Halloween

Wishing everyone a safe and spooky Halloween!

carved and lit pumpkin photo

stock image

I now offer instant downloads at my Etsy shop.  Currently, I have listed some great holiday (including Halloween), textures and food images listed. These are located in the Digital Images sections at the shop. The images may be used for a variety of purposes including website backgrounds and headers or printable content for note cards, invitations, prints etc. Texture image files make fabulous layers for image editing or composited art. Often I find the addition of a texture layer sparks creativity for an image or project I am working on.

Of course, basic knowledge of Photoshop or some other image editing software is required. All files are available via instant download upon receipt of your payment.

Terms of Use

The digital instant download images are high quality Royalty Free jpg files. You may resize, crop, print or manipulate the image and sell it as part of a new product you create. Also, you may use the instant download file multiple times.  In addition, you may not sell, resell, give, loan, share or transfer the image or file to any third party.  As with most instant downloads, the original owner maintains the copyright and is the sole owner of all images.

Thanks for stopping by. View more of my Halloween and other stock images are available at my Etsy Shop.  Visit my website to see more of my work.

Capturing Lightning Strikes With iPhone

The other night I had a great opportunity to capture lightning strikes with an iPhone.  Anyone who lives in Florida knows one thing for sure, we have some dramatic weather, from beautiful skies and sunsets to tremendous lightning storms. It can be quite a show. Now, I am not by any means a storm chaser since I like to seek shelter quickly if the situation demands it.  So for capturing lightning I try to keep it simple and using an iPhone is the utmost in simplicity.

For the two images below I hand held my iPhone, however,  they probably would of been slightly better on a tripod. Everything is better on a tripod and since I am a bit of a perfectionist, I am now looking into a tripod mount for my iPhone. One thing I did use was a great App, iLightningCam, that triggered the camera when a lightning strike was detected.  Every time a strike was detected it would rapidly fire off 5-7 images.  I probably shot 100 images or more to get the two below. I also have an iPad and it was helpful to let them copy to the iPad for viewing editing and deleting.

Tips for capturing lightning with iPhone:

Purchase the App iLightningCam or something similar.

Be sure your iPhone has enough available storage space. The App fires off many images and it takes a lot of tries to good ones.

Make certain you have a fair amount of battery juice available. It takes power to write all those images to your storage.

Use a tripod if you have one or focus on holding the camera steady.

Try to keep the horizon level.

Experiment with the different menu items of the App to find which one works the best for you and your lightning show.

Above all else, stay safe!

Lightning strike on Sarasota Bay


lightning storm sarsota, fl

Thanks for reading and be sure to check out more of my work at www.susanmcanany.com

Hermine Inspired Abstract Images

The past few days hurricane Hermine inspired me to experiment with some abstract techniques in the studio. Hurricane Hermine was a huge rain event where I live and capturing a few droplets seemed the perfect way to illustrate some of its effects.

This is a shoot I researched to help get out of the box with my thinking and boost creativity. I was working in studio and here is the general set up. The image consists of a mixture of water and oil in a glass container. This container is situated on plexiglass, elevated around 12 inches with a multi- colored cloth beneath.  There are plenty of video tutorials on line demonstrating this technique.  Although the technique did have its challenges, some of the results I found to be very inspiring thus the name of this post Hermine inspired.

The biggest challenge was finding a fast enough shutter speed to freeze the moving water. To create the bubbles, the mixture had to agitated by either gentle moving the container or stirring the mixture of water and oil. However, the agitation created movement of the water and oil causing images to be blurred at lower shutter speeds. On the plus side, it forced me to really work with the Shutter/Aperature/ISO matrix to get some good shots. As with many shoots the more images you take the greater the probability of succeeding.

Thanks for reading and I hope the next time you have some crazy weather in your area, you let your creative juices flow and make some art!

Hermine Inspired Images

“Bubbled Over”

hermine inspired abstract art photograph

“Cellular Activity”

Hermine inspired blue abstract art photograph

Check out more of my work at susanmcanany.com.

Creating a Digital Signature

For quite some time, I have been contemplating creating a digital signature for signing and numbering my prints. Typically, I print on paper allowing an additional half inch on all sides of the print and after I receive the print from printer, I sign on the lower right hand corner of the print. Lately, I have been experimenting with having my work printed on aluminum and plexiglass, thus I wanted to create a digital signature to place on the image prior to printing. After doing some research, I found two different methods. The first involves scanning the signature as a jpg file and manipulating in Photoshop. The second technique is to create a brush of your signature. This is the one I decided on and will go into further detail on the technique.

Creating A Digital Signature

  1. In Photoshop, create a new blank page file.  I found using 3 inches Wide x 2 inches Height; Resolution 300 dpi to work great for prints that are 20 x 30 inches in size. If you are printing smaller or larger you will probably have to experiment with the size of your signature. In addition, you can also use the Transform command to resize the layer once it is on the print.  Also, assign the parameters of Color Profile and Bit Size what ever you most commonly use on the file.

Creating a Digital Signature

2. Select your brush tool. I used the 15 pixel right slant Calligraphy brush, usually with black paint. Depending on your image you may need a different color for the text to be obvious.  If you do not have the Calligraphy brushes imported into Photoshop, you can Append the file and add them from your brush folder.

creating a digital signature

3.  Now comes the fun part. Using your Wacom pen and tablet, write your name on the translucent 3×2 file you created. Be prepared to experiment with this because you probably will not like your first try. Just go back in your History Palette to erase and start over. Once you get your signature the way you want it, save it as a Brush Preset and you will have it ready and available at any time.  Actually, I had a lot of fun with this part.

sign2b_16_ppcpBest

4. To place on an image, just open both files in Photoshop. Drag and drop the layer from your signature file onto your image. From there you can use the Transform tool to resize if necessary and place where you want it.

Whether you are creating a digital signature for fine art prints or using this technique to watermark your images, remember to have fun when you are creating your digital signature.  Thanks for reading and check out my work  at susanmcanany.com.

Memorial Day – A Day of Thanks

For me each year Memorial Day gets more moving.  When I was younger, it meant off of school or work, with long weekends for play and party. Although, I still play a lot on any weekend and would like to think I am still young, I do give more thought to this holiday, Memorial Day. I often think about the circumstance our servicemen and women experienced being away from home and especially being faced with fighting a war. Mostly I believe they are just young people going to fight a war they maybe did not even understand and going to places on the other side of the world away from family and friends. Like with any decision, we all make them for many different reasons and often experience outcomes never anticipated. I am, however, eternally grateful for all military people who decided to serve and are currently serving, who work everyday to protect the life and liberties that we so enjoy and often take for granted.  You are very special people and I offer a very sincere Thank You!

“Red, White & Blue”

memorial day tribute Memorial Day Tribute to All Service Personnel … Thank you!

Thanks for reading and more of my work can be viewed at www.susanmcanany.com.

Creativity Inspiration

Creativity inspiration comes in many forms and often amazes me what may ignite it. We just celebrated a holiday weekend when amidst fun, food and frolic I experienced I heavy sensory stimulation to my taste buds; I was on the verge of orgasm. Now that may be a little bit of an overstatement, however, I did get your attention!

Just like anything else, creativity inspiration needs attention and enrichment. Here are a few techniques I have found to help jump start mine.

Creativity Techniques

  • Keep an open mind.
  • Look at others work.   As Salvador Dali once said “Those who do not want to imitate anything, produce nothing.” Looking at art always simulates ideas, often unrelated to whatever I was looking at. I may be reminded of an idea I previously had or a technique I want to use again on a specific piece.
  • Read about other artist’s creativity inspiration. There is a lot of great information out there on the web and also many wonderful books, iBooks and podcasts regarding this subject. One of my favorites is “Steal Like An Artist” by Austin Kleon.
  • Write. This is very effective for me. Get a notebook and everyday write down all the miscellaneous thoughts and issues that keep playing in your head. The result is you purge your brain of some of the small stuff, which, allows room for creative thoughts to surface.
  • When all else fails just get in your creative work space or on location and just do busy work. For me I may straighten up my studio or clean my camera or maybe even sharpen pencils. Many times this sparks creativity!

So to bring this full circle what exactly cranked my creativity this time?  As mentioned, we just celebrated a holiday. Of course, there was a wonderful meal and for dessert we had eclairs that were actually warm. Now, I have not had an eclair in years, probably since my childhood. And, although, my Mom was a dessert nut and did make eclairs along with many other delightful desserts, I can not remember experiencing a warm one. My mouth was watering as I ate it. Now that was a first for me and just goes to show new experiences are open to you at any time, if you let your creativity loose.

Unfortunately, I don’t have any eclair photos to share, but I wanted to post a few other dessert images from my extensive stock image library. Maybe I can get your mouth watering also! Enjoy!!

creativity inspiration

creativity inspiration dessert image

creativity inspiration strawberries

Thanks for reading! Check out more of my work on my website.