Tag Archives: tutorial

Tips for Getting Sharp Images

Recently I had to mentally review tips for getting sharp images for a project I am working on. Now many of these techniques I have been using for years, but this project involves a macro lens and a moving subject so I needed to dig deep for all tips and techniques for getting sharp images I have come across throughout my photo career. Here is what I came up with and I wanted to share them with you.

Tips for Getting Sharp Images

  • A fast shutter speed is required to freeze movement, so make certain the Aperture and ISO on your camera are set appropriately to achieve a Shutter Speed of at least 200. Faster if you can get it there because the faster the better for freezing movement.
  • Depending on lighting conditions, there is a good chance you will need to increase your ISO to reach a fast enough shutter speed.
  • If using an external flash, experiment with High Speed Synch to see if that would be useful.
  • Use a support system. This could be a tripod, monopod, a pile of books or wall to brace yourself or your camera.
  • Invest in a camera shutter release or use the self timer on your camera.
  • If you are not using “live view” on your camera, use the mirror lock up function if available.

If you follow a few of the recommendations above for tips for getting sharp images, I am sure your images will be sharper and move beautiful.  Most of all have fun when you are shooting.

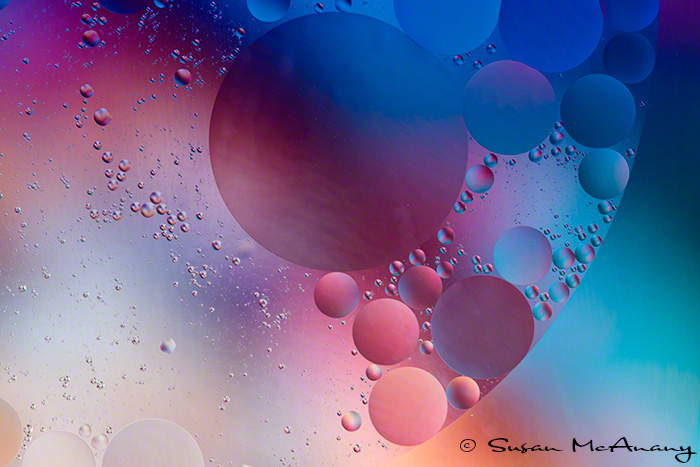
Here is one of the images I have been working on.
Tips for Sharp Images


Thanks for reading and check out more of my work at www.susanmcanany.com. Also if looking for great stock images, visit my Etsy store. I offer a wide range of digital downloads.

 

Creating a Digital Signature

For quite some time, I have been contemplating creating a digital signature for signing and numbering my prints. Typically, I print on paper allowing an additional half inch on all sides of the print and after I receive the print from printer, I sign on the lower right hand corner of the print. Lately, I have been experimenting with having my work printed on aluminum and plexiglass, thus I wanted to create a digital signature to place on the image prior to printing. After doing some research, I found two different methods. The first involves scanning the signature as a jpg file and manipulating in Photoshop. The second technique is to create a brush of your signature. This is the one I decided on and will go into further detail on the technique.

Creating A Digital Signature

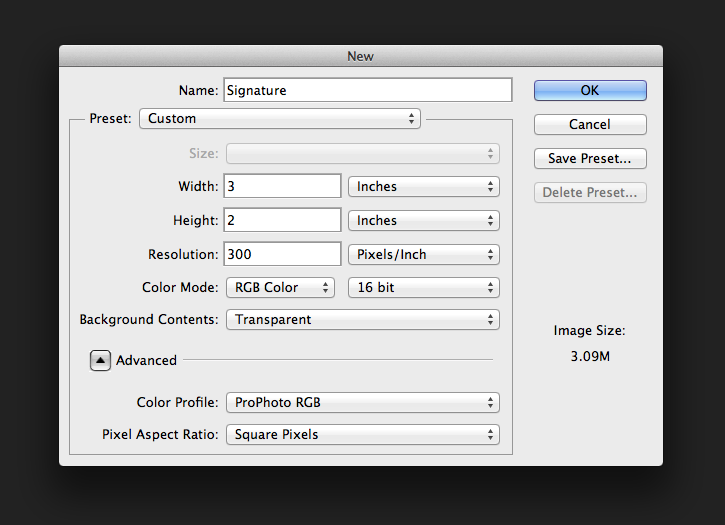
  1. In Photoshop, create a new blank page file.  I found using 3 inches Wide x 2 inches Height; Resolution 300 dpi to work great for prints that are 20 x 30 inches in size. If you are printing smaller or larger you will probably have to experiment with the size of your signature. In addition, you can also use the Transform command to resize the layer once it is on the print.  Also, assign the parameters of Color Profile and Bit Size what ever you most commonly use on the file.

Creating a Digital Signature

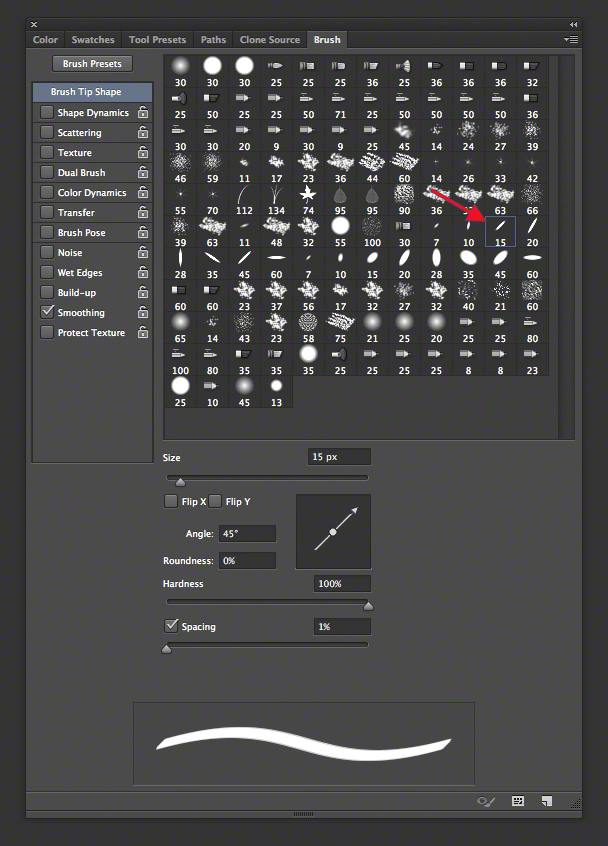
2. Select your brush tool. I used the 15 pixel right slant Calligraphy brush, usually with black paint. Depending on your image you may need a different color for the text to be obvious.  If you do not have the Calligraphy brushes imported into Photoshop, you can Append the file and add them from your brush folder.

creating a digital signature

3.  Now comes the fun part. Using your Wacom pen and tablet, write your name on the translucent 3×2 file you created. Be prepared to experiment with this because you probably will not like your first try. Just go back in your History Palette to erase and start over. Once you get your signature the way you want it, save it as a Brush Preset and you will have it ready and available at any time.  Actually, I had a lot of fun with this part.

sign2b_16_ppcpBest

4. To place on an image, just open both files in Photoshop. Drag and drop the layer from your signature file onto your image. From there you can use the Transform tool to resize if necessary and place where you want it.

Whether you are creating a digital signature for fine art prints or using this technique to watermark your images, remember to have fun when you are creating your digital signature.  Thanks for reading and check out my work  at susanmcanany.com.

Creating Borders Around Images

Creating borders around images can do a lot to enhance an image and make it stand out. This is especially important for viewing on the web whether you have your own website or using Pinterest, facebook or other social media outlets or image sharing sites. It can be a simple as putting black borders around an image or something a bit more complex with multiple borders and simulating a frame. Below are three quick steps to putting a border around your image using Photoshop CS6.

Creating Image Borders

1) Give some thought to the final size you would like your image. Using Pinterest as an example, I know one of their pin sizes is 735 x 735 pixels and pins look good with a 8 to 10 pixel border. For this example I will use a 10 pixel border in black.

image_size

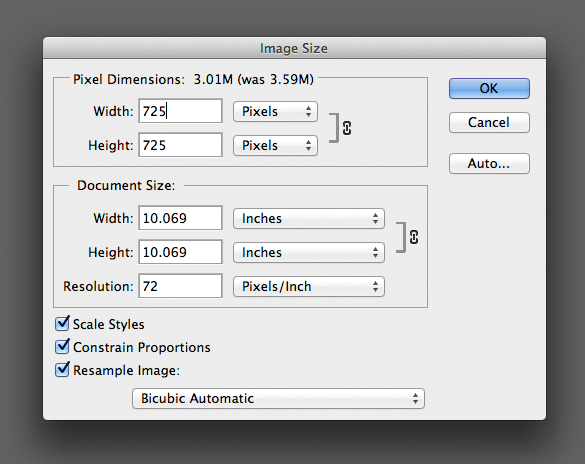
Image Size Screen in Photoshop CS6

2) Open the image in CS6 and go to Image > Image Size and resize the image to 725 x 725 pixels x 72 pixels.If your image is not square format, you could use the Crop Tool and crop an interesting portion of the image and link the Pin to your posted image. If you use the crop tool, be sure to click the Option to Delete cropped pixels located on the top of your toolbar.

canvas_size

Canvas Size Screen from Photoshop CS6

3) Final step is to go to Image > Canvas Size and expand the Canvas. First make sure Pixels is selected in the drop down menu and enter 10 in the Width and Height. This will change your total image size to 735 x 735 pixels. For the Canvas extension color field use the drop down menu and select Black or one of the other choices of White, Grey. You may also want to select a custom color using Other option and Color Picker to select the color you desire. If the Canvas extension color option is dimmed and you are unable to make a selection your Layer is probably not locked. The canvas extension will appear transparent after accepted. Just add a blank Layer and fill that layer with whatever color you want for your border.  Either way works beautiful and creating borders around your images gives you a great tool for finishing off your images.

Here is an example of a pin I created using the above three simple steps.

susan_mcanany_art

Thanks for reading and more of my work can be viewed on www.susanmcanany.com.

Follow me on twitter: @susanmcanany